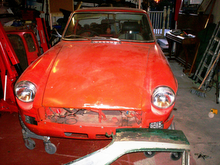
I also had substantial rust damage to both corners of the boot, but still confined to rather small areas, so i have attempted to manufacture repair patches from sheet steel using hand made formers and a hammer, inspired by some recent Practical Classic magazine issues.
Some may say this a tad mad, considering the cost of a boot floor, but my intention with this car is to give me the necessary skills to repair any cars that come into my possesion in the future, Mgs are extremely well catered for, but old Wartburgs or DKWs are a rare breed indeed, i may end up owning one car with terrible parts/panel availability.
Here i can show the holed section with all the rust cut out, it has been cut back so far also as this is where the rear chassis rail repair started, my start of repair involved fabricating the first of many seperate patches, tack welded in to place, the one below forming the lip to chassis leg,

my next part of the repair involved fabricating from sheet the part involved to the rear curve of the boot floor, aftre drawing out and cutting from cardboard, i added 15mm to the template and transfered it to the steel stock, and form a lip by hammering round an oak former and cold chisel head, very time consuming indeed
Here is the patch I created below,

Part of the final repair does have to include the ribbed section, I fabricated the stepped section by clamping a flat blank cut to size and hand forming it on the vice between two pieces of scrap angle iron, and careful hammering with an oak dolly i made,

Now i offered the two parts over each other to scribe a cut line, and tack welded the two patches together and trial fitted, pretty happy so far on fit,  All that is left now, and potentially the most awkward bit, is to form another stepped section to form the chassis leg join, i'll be doing tonight,,
 my next part of the repair involved fabricating from sheet the part involved to the rear curve of the boot floor, aftre drawing out and cutting from cardboard, i added 15mm to the template and transfered it to the steel stock, and form a lip by hammering round an oak former and cold chisel head, very time consuming indeed

 All that is left now, and potentially the most awkward bit, is to form another stepped section to form the chassis leg join, i'll be doing tonight,,

 Once removed, i could strip down to inspect it, it was known to be working, so i didnt fully disassemble it, only removing the pulley from the shaft,
 I ordered up the rear spring hanger repair panel from MGBhive, and the closing plate which removed from the above picture, and using a template from the cut away part, i welded in the repair, shown below,
 I dressed the area with rust cure, then red oxided the area for rust proofing, and drilled the closing plate at regular intervals with a 6mm drill, to allow plug welding with my MIG welder, a technique which replicates a spot welder, and also seam welded along the edges to finish.


